While using a cutting mat for crafting, the correct position of the vinyl on it is very important. You should place the heat transfer vinyl shiny side down on the cutting mat. Place it on the top left corner, aligning the piece with the grid lines of the mat. In this article, we’ll tell you all there is to know about using a cutting mat for heat transfer vinyl.
It is one of the most important tools used by crafters. It is made of either vinyl or rubber and has a sticky surface. Most cutting mats also have grid lines on them that help with placement and measuring. They also have different levels of tacks.
A cutting mat protects the surface from cut marks from the blade of your automated cutter. It also helps prolong the life of the blade so that it does not become dull. Some cutting mats also have self-healing properties. This means that the cut marks it receives heal automatically due to its elastic surface.
Why Should You Use A Cutting Mat For HTV?
Heat transfer vinyl is one of the most popular crafting materials out there! If you’ve ever marveled at custom-designed clothing items or accessories, chances are heat transfer vinyl was used to personalize them! It’s highly versatile and can be used on a wide range of fabrics and surfaces.
Unlike regular adhesive vinyl, heat transfer vinyl requires heat and pressure in order to be activated. It shows the best results on cotton, polyester, and cotton-polyester blends, which is why it’s the perfect material for customizing your clothing.
In order to carve out your designs on the heat transfer vinyl, you will need machines like Cricut or Silhouette. And for this, you will definitely need a cutting mat. It will hold your vinyl firmly, ensuring precise and accurate cuts that are easy to weed later on. Without one, your vinyl might move inside the cutting machine when it is doing its job and your design might get ruined.
The guides of the cutting machine hold the mat firmly. It is moved back and forth during the cutting process and the heat transfer vinyl stays on it in one place. Hence even if you are cutting a very intricate design, it will be done perfectly.
Types Of Cutting Mats
There are different types of cutting mats, and each caters to a different purpose. They not only differ in colors but tack levels as well. Every cutting machine generally comes with a standard tack cutting mat that will fit your machine. You may want to expand your cutting mat collection the more you craft. In this section, we’ll introduce you to the three commonly used cutting mats.

Standard Tack Cutting Mat
The standard-tack mat is the most common type used for heat transfer vinyl cutting. It is generally green in color and has a moderate level of adhesive strength. It is incredibly versatile and is ideal for materials that are neither too thick nor too thin. It holds the HTV securely in place without leaving marks on the surface below.

Strong Tack Cutting Mat
Strong grip cutting mats have a higher level of adhesive strength. They are generally purple in color and are perfect for thick materials, such as felt and leather. We also recommend using a strong grip cutting mat if you’re working with specialty vinyl materials, which require a more secure hold as they are likely to shift during cutting.

Light Tack Cutting Mat
Light tack cutting mats have a low level of adhesive strength. They are blue in color and designed to work with lightweight materials. We recommend using a light tack cutting mat for the following materials: paper, sticker paper, and light cardstock. You can also use a light tack cutting mat if you’re working with a thin vinyl material.
These are the main types of cutting mats you may be expected to choose from when working with heat transfer vinyl. By selecting the correct type, crafters can ensure that the entire vinyl application process goes smoothly. We recommend using a standard-tack cutting mat for heat transfer vinyl.

How To Put Heat Transfer Vinyl On A Cutting Mat?
Now that you know the best type of cutting mat for heat transfer vinyl, we’ll guide you on how to place it correctly on it.

- Peel off the protective cover sheet attached to your cutting mat, but don’t throw it away! You’ll need to place it back on the mat after you’re done using it. It prevents the mat from losing its adhesive strength after use. When it’s removed, the sticky surface of the cutting mat is revealed.
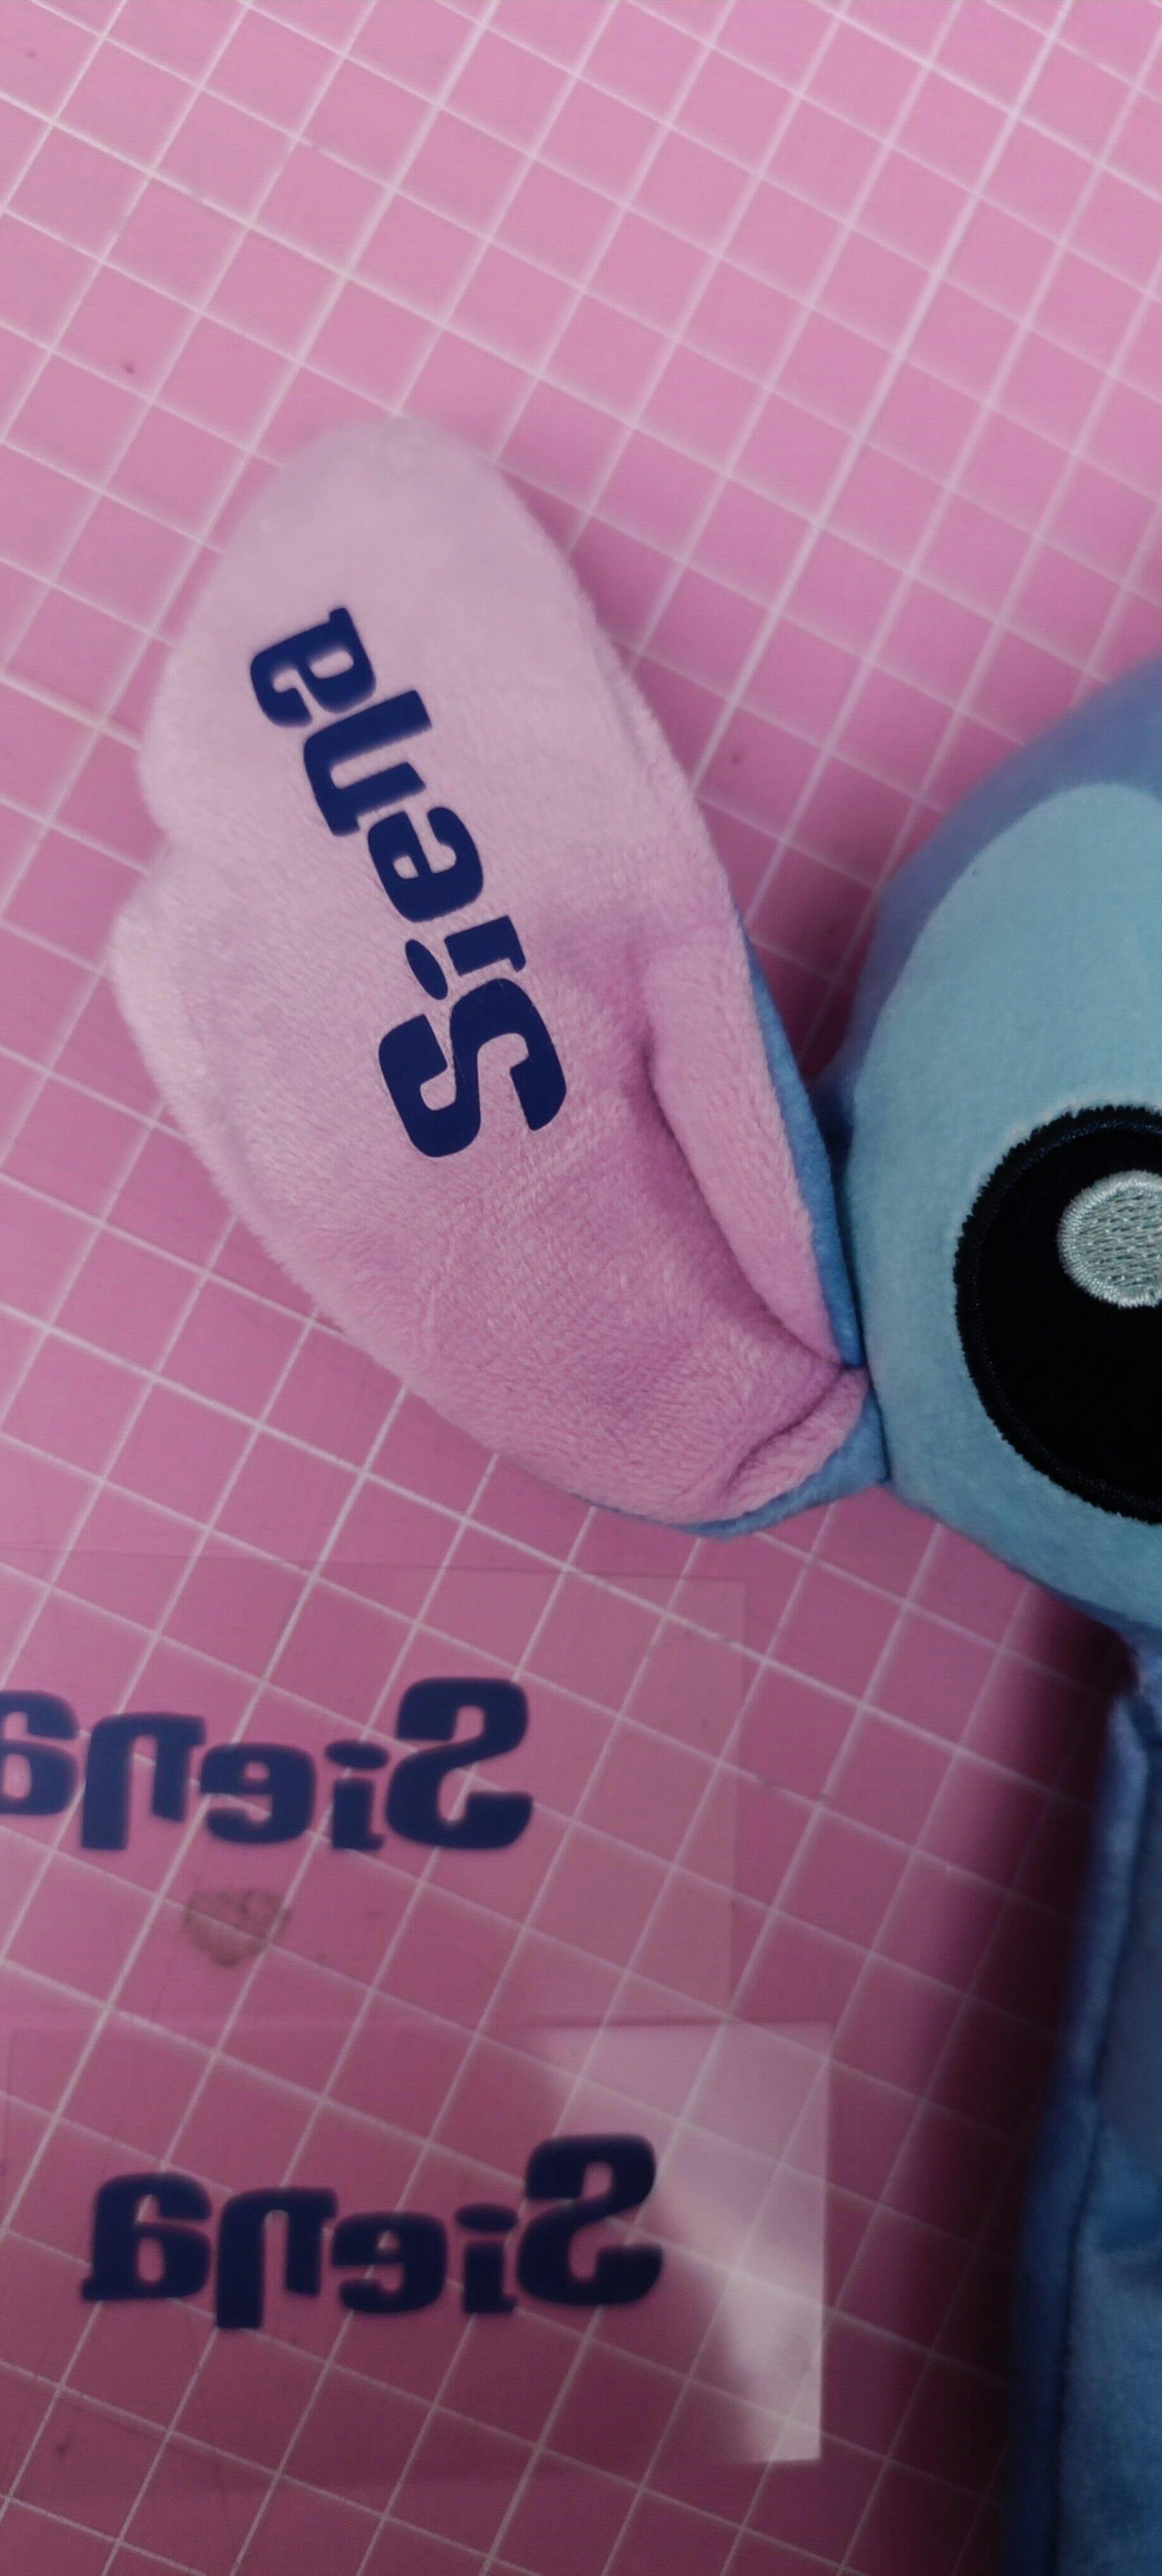
- Place the heat transfer vinyl onto the cutting mat. You will be using the green one that has standard tack. Make sure that the vinyl is placed with the dull side facing up. This is the adhesive side of the heat transfer vinyl. The shiny side of the vinyl, which has the carrier sheet, will be in contact with the mat.
The grid lines visible on your cutting mat will help you when you’re positioning your vinyl. The top left side of the vinyl sheet should align with the top left corner of the grid. Make sure that the sides of the heat transfer vinyl are as close to the edge of the grid as possible.
Once you have placed the mat, smooth it out with a squeegee so that there are no creases and it has adhered well to the mat. It is imperative that the mat stays in place during the cutting process.
- There are many cutting machines on the market that you can use. We will tell you how to load the mat with HTV in Silhouette. Open Silhouette Studio and go to the ‘Page Setup’ panel. Cutting mats are often available in a number of different sizes.
In the ‘Page Setup’ panel, you will need to specify the cutting machine you’re using as well as the size of the cutting mat and the vinyl material.
- Load the cutting mat into the cutting machine. Align the left edge of the cutting mat against the blue line and arrows visible on the Silhouette Cameo. If you’re using a different cutting machine, the marking on it may be different.
Make sure the arrow visible on the top of your cutting mat is pointing toward the machine. Adjust the white rollers on the right-hand side of the Silhouette Cameo such that the machine is gripping the cutting mat firmly.
- On the machine’s display, select the ‘Load Cut Mat’ option. For some cutting machines, there may be a button on the machine itself that you can press.
- If you are using Cricut, this is how you load the cutting mat with heat transfer vinyl on it. Using both hands, insert the cutting mat into the Cricut machine under the roller guides on each side. Press the arrow and the machine will grip the mat. If there is any issue in the alignment, the machine will fix it automatically.
And that’s it! That’s the process for placing heat transfer vinyl on a cutting mat. The steps we’ve outlined in this article are specific to Silhouette Cameo and Cricut cutting machines. If you’re using a different one, there’s no need to worry. The general process for loading heat transfer vinyl onto a cutting mat will be the same.
Care Instructions For The Cutting Mat
If you love to work with HTV or have a small business of your own, it is important for you to keep the cutting mat in impeccable condition. Follow these care instructions for the longevity of your mat:
- Store your cutting mat properly when not in use. Replace the protective sheet and keep it on a flat surface. Do not roll the mat.
- Keep it away from heat and sun otherwise your mat will warp.
- Also keep it away from extreme cold or your mat will become brittle.
- When your heat transfer vinyl design is cut and you are done using your mat, clean it with a soft cloth to remove any dust particles or fibers.
Cutting Mats At TeckWrap Craft
At TeckWrap Craft, we have premium quality cutting mats for our ardent customers in different tack levels. These are available in length and width of 355 x 330mm. They have a grid on them and their tack is protected by a clear transparent cover. These are durable and give long-lasting performance. They are easy to use and are compatible with Cricut and Silhouette cutting machines.
The purple mat has high tack, whereas the blue and green mats have low and standard tack respectively. For heat transfer vinyl, you will use our green mat. We also have transparent standard grip mats. Their size is slightly smaller, that is, 345 x 335mm. You can buy the one that best suits your needs or buy all if you are an avid crafter.
Frequently Asked Questions
Q. Why does my cutting mat feel too sticky?
The adhesive on a brand-new cutting mat will often feel too sticky. If this is the case, removing the vinyl material from the mat after cutting may be difficult. Due to this reason, some crafters prefer to condition their cutting mats in order to make them less sticky. To do this, all you need to do is take a t-shirt and tap it over the sticky side of the cutting mat a few times. This will reduce the adhesive level of the mat.
Q. What is the purpose of the protective sheet attached to the cutting mat?
All cutting mats come with a protective sheet stuck to the adhesive side of the mat. This cover sheet is incredibly important. You will need to remove it in order to load the heat transfer vinyl onto the cutting machine. Make sure to replace the cover sheet when you’re done using the mat! This will keep your mat clean and protect the adhesive layer on it during storage.
Q. How long does a cutting mat last?
A good quality cutting mat should last for at least 45-50 uses before it starts losing its stickiness. If you don’t take care of your cutting mat, it may start wearing out quicker. You can also extend the life of your cutting mat by cleaning it when it gets dirty.
Q. How can I clean a cutting mat?
You can use a lint roller to clean your cutting mat. This will remove any dirt, scrap, or leftover material that is still stuck on the cutting mat. A scraper tool can also be used for this purpose. You can also clean your cutting mat by wiping it down with alcohol-free wipes. Let the mat dry before reusing it or replacing the cover sheet.
Final Thoughts
So that’s how you place heat transfer vinyl onto a cutting mat. By now, you’ll know exactly how to choose the right cutting mat for your crafting project as well as the steps for putting the vinyl onto it. If you read this article closely, we’re sure you won’t face any difficulty in this process. For the finest, high-grade cutting mats in different tack levels, visit the TeckWrap Craft online store.